Background
So my last PC build project was somewhat 8, 9 years ago, for a core i7-960 quad-core 12GB desktop. It started off with a Nvidia GTX 460 SLI, then later moved to a single ASUS GTX 770. The initial power supply (Corsair HX series) died after maybe 6 years of usage, then I switched to a modest EVGA 650.
With promising games rolling out all the time like Anthem, Tomb Raider, it’s probably time for an upgrade, let’s do this then – let the build begin!
In this blog entry I’ll be discussing mainly the parts and why I chose them, if I included everything into one blog entry it’d just be too much.
Sourcing the Parts
Start by using the handy picker on pcpartpicker.com, where anyone can easily assemble all the components in a single view, along with some basic compatibility checks like CPU sockets vs. Motherboards, also it’ll try to find the lowest prices currently available in major online retailers in various countries, but do note that you can save a fair few pennies if you are willing to do the price checks yourself + cashback websites.
I should also be clear that you should check your case’s physical limits, especially if you’re using a beefy graphics card or a large AIO liquid cooler. Most modern cases will favour SSDs over HDDs which results in reduced lengths, and in turn this could mean your build (though compatible as a whole) may not actually fit in your desired case.
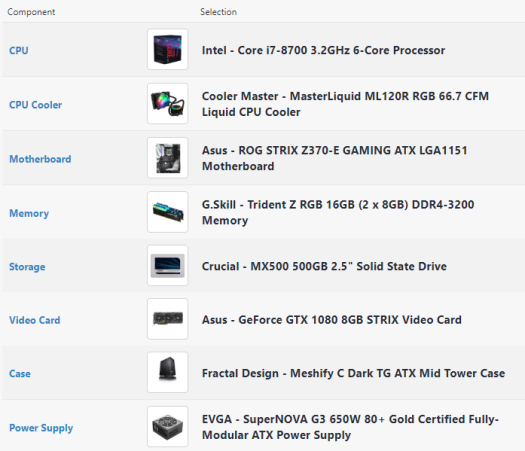
After some digging, here’s my list:

Why These Parts?
Case – Fractal Design Meshify C (Dark Tint TG)
Yes, I’m hopping onboard the tempered glass train – though I absolutely refuse to have a solid-front PC case that provides no airflow, hence I have gone for the Meshify C – a stylishly designed case with excellent cable management while still being small enough to be placed on the desk.
CPU – Core i7-8700
With two additional cores, this is a decent upgrade – and since I’m not going to be doing overclocking, there’s no point in buying the more expensive K-variant unless you’re thinking about the resell value. This little guy should be sufficient in everything I have to throw at it.
Also I’ll be using the Cooler Master ML120R AIO liquid cooler, which will feature in the next blog entry where you see how it’s installed.

Motherboard – ASUS ROG Strix Z370-E
This is based on a couple of reasons like decent I/O options and built in Wi-fi, but perhaps the most important reason was because I knew my graphics card would also be an ASUS ROG Strix, so as much as possbile I’d like all the components in a single ecosystem. Oh and RGB, of course it had to be RGB.

RAM – G.Skill Tridentz RGB DDR4 3000Mhz
Yep, you guessed it – the RGB factor is definitely one of the many reasons I chose these bad boys. I’ve only gone for 16GB RAM, since I was bearing using all 12GB in my last rig. Even if I have to eat my words down the road (in maybe a few years time?), I’ll still be able to ugprade to 32GB ram by getting another set of 2x8GBs, which hopefully will be significantly cheaper then.

Boot Drive – Crucial MX500 500GB SSD
A single SSD running the main OS, and I’ll be keeping it as clean as possible – I’ll also be running a few 3.5″ HDDs that are 1TB each to house larger files, and if I do need to ugprade, the PC case AND the motherboard offers plenty of additional storage expansion points.

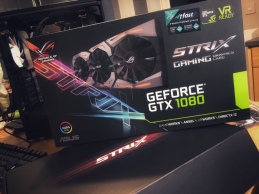
Graphics Card – ASUS ROG Strix GTX1080 8G
I really struggled with this one. The ASUS ROG Strix has always been the one I wanted to get, but it’s ALWAYS so darn expensive (due to the whole BitCoin shenanigans). Luckily I managed to get a decent deal on the 8G version (the base model, followed by A8G and O8G) – which in theory, is able to overclock to perform similar to its bigger brothers. In reality though I doubt that would convert into anything more than 1-2 FPS, all GTX 1080s perform exceptionally well based on all the research/reviews/analysis so, I think I’m safe with my choice.
So that’s it! Now that we have all the parts (ish), wait for my next blog entry so you guys can see more photos and also installation fails that I recorded.


